First off, let me assure you that yeast are a unicellular fungi. They are as vegan as eating a mushroom. I’ve been getting a couple of notes that yeast is not vegan and I just wanted to clarify that yes, it truly is. Honey is not vegan. I know. That is why I have the note at the top of the page. Some beers are vegan, too, but some include fish bladder (like Guiness), so if you are looking to booze it up without possibly eating any bits of animals, making your own booze is the way to go!
Everything you need to make your own cider:
Bare Essentials:
- Juice – any kind will make a cider as long as it has sugars in it, doesn’t have any fancy preservatives in it, and isn’t too acidic.
- Yeast – any kind will ferment the juice, but some are better than others. You need at least a half a tablespoon, but more than a tablespoon is just wasting it.
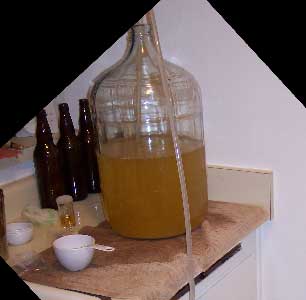
- Something to ferment in – this means a glass carboy or a food grade plastic bucket that can be airtight when stoppered – usually 5 gallons is status quo for brewing, but it is up to you.
- Fermentation Lock and Drilled Stopper – These are pretty cheap and you can reuse them practically forever.
- *Bottles – (10 bottles for each gallon) pop off top bottles are easiest to rebottle. You can reuse them over and over and over after sanitizing.
- *Bottling Crowns – Bottle caps for pop-off top bottles are cheap. A couple of bucks should get you enough for 10 or 15 gallons of cider.
- *Capper – I suggest an Emily Capper – they are less than fifteen bucks and easy to use.
- Tubing – you need something to get the cider out of the fermenter and into the bottles, right?
*You can get away with either using any old bottle with a lid, really, but make sure it is sanitized, sturdy enough to handle some pressure, and air tight.

Extras that are Highly recommended
- Racking Cane – These are cheap. They will keep the yeast sediment out of the bottles and they will make it a lot easier to get the cider out of the fermenter. Just attach one to the tubing and plop it in the fermenter when you are bottling.
- Fruit Wine Yeast – These are yeasts that will produce a more intense boquet of aroma based on the fruit juice used. I prefer to use Epernay II.
- Bottling Wand – More cheap stuff that makes a world of difference. A bottling wand will help you fill the bottles more cleanly and up to the perfect level to keep carbonation from blowing up your bottles (usually). Just attach it to the other end of your tubing.
- Three-piece-fermentation Lock – These are easier to clean and cost about the same as any other kind of lock you would get.
- Secondary Fermenter – This is just another fermenter that you can transfer your cider to when it is about half way done. Transfer it from the old to the new one minus the dead yeast sediment at the bottom of the old one. This makes a cleaner tasting cider that is slightly less bitter.
- Iodophor – This is a great sanitizer because you don’t have to rinse it out (thus recontaminating whatever you just cleaned). Just pour out the excess and let it evaporate for a bit until it is gone.
- Bottle Blaster – An adapter for your faucet or hose to help you clean out the bottles you are using. They have to be cleaned, and cleaning them by hand takes FOREVER.
There are tons of other extras you can buy if you want to really go all out, but seriously, if you just want to make some tasty cider quickly and easily, you don’t want to go broke buying the gear to brew it.
Mixing
Whether you are using a carboy or a food grade bucket, you want to make sure it is completely sanitized before using it. Use the Iodophor if you have it, though you will rarely have problems if you don’t just so long as you use some kind of detergent to remove all bacteria and mold spores. If there is ANYTHING encrusted in the carboy or bucket make sure you scrub every bit of it off. A sanitizer can’t sanitize what it can’t soak into.
- Prepare your yeast – you will probably be using a dry yeast. To get it ready, start out mixing it with some warm water. Not hot. Warm. If it is the same temperature as your skin, that is just fine. I use about two cups of warm water and mix it in an empty juice jug. Let this sit for five to ten minutes before pouring it into your fermenter.
- Pour your juice into your fermenter – Splash the juice into your container so it gets some aeration. The yeast will be much happier if it has some bubbles of gas to hang out with.

Fermenting
This part is usually easy, but is what turns juice into cider. Fermenting can sometimes be tricky because of environmental conditions, sugar content, yeast types, and bacterial invasion. To protect against these things, keep your cider fermenting in a cool dark place that doesn’t get terribly cold, make sure there is plenty of sugar in your juice (not artificial sweetener), get a fairly fresh yeast if you are reusing your yeast slag from your last batch, and sanitize and keep sanitized everything your cider will be touching or sharing air space with.
- Place the garroted stopper into your fermenting container without the air stop and get it in there really good. If the lip of your fermenter is not dry the stopper won’t fit snugly so dry it out with a paper towel first.
- Slide your airstop into the drilled hole of your stopper to create even a more snug fit. You can get an airtight seal without much effort, so don’t overdo it. The pressure of over-compressed rubber could actually pop the stopper out with enough time.
- Fill the airstop with water or alcohol or liquor or anything that wont grow mold on it over a period of a month or so.
- Place the fermenter somewhere it won’t get much light, won’t get too hot, won’t freeze, and won’t get bumped around.
- Wait two to three weeks depending on environmental factors and sugar levels. The thing to look for here is bubble production – a crazy foamy bubbling is likely now and then during the end of the first week, but toward the end it will just be a little bubbly. When it seems to be bubbling very sparsely, then is the time to bottle. Beyond three weeks is TOO MUCH.


Bottling
After a couple of weeks your cider should be looking pretty tired. The alcohol level will probably be somewhere between six and eight percent but it will taste pretty sour because the sugars have mostly been digested by the yeasts. Take a taste now to see where everything is at, but make sure not to contaminate anything when doing so.
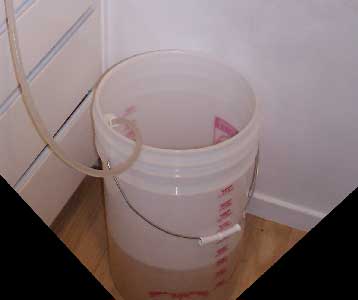
- Place your fermenter on a higher place than your bucket for mixing – the easiest way to do this is by transferring your cider to a food grade bucket using the racking cane – a five gallon bucket is actually designed to hold up to six gallons, so even if it fizzes up you won’t make a mess. The racking cane will leave out the dead yeast.
- Siphon everything but the last inch from the fermenter to your bucket being sure to keep everything very sanitary.
- Dispose of the yeast sediment in the fermenter or save it in a sanitized container topped with an airstop if you want to use the slag for another batch immediately after.
- Mix in up to two and a half cups of any of the following, or a combination of a few of them: beet sugar, corn syrup, brown sugar syrup (just mix sugar and water and boil for a minute before adding), bleached white sugar syrup (same as the brown sugar directions), sugar cane juice, honey.
- Add a few tablespoons of vanilla, oak extract, and some molasses or any combination of other flavors you think would compliment your cider – it is up to you.
- Mix gently with the racking cane or a long sanitized spoon until all of the sweetener is dissolved and lift the bucket to a high spot to siphon from this container to bottles.
- Place your sanitized and dried beer bottles on a lower spot – you can use big bottles and normal size bottles. The large ones are just short of double the size of the small ones so you will use roughly 25 big bottles or 50 normal bottles to house five gallons of cider as it carbonates and finishes fermenting.
- Using your racking cane and tubing to make a siphon fill your bottles up to about an inch and a half to an inch from the lip of the bottle.
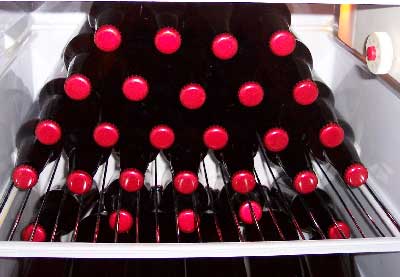
- Cap your bottles with whatever capper you choose. My choice, a red Emily Capper, is quick and easy to use, but I know some people with arthritis or bad coordination have trouble with it.
- Store your bottles in a cool dark place for two more weeks or in a cold dark place for three or four more weeks.
Consuming and Storing
Your cider should be ready after about a month to a month and a half of waiting. When serving it, remember each bottle is full of a living and changing thing. The yeast will be multiplying, sometimes mutating, and refining the cider as time progresses. The alcohol level should be somewhere between nine and sixteen percent. If a batch of cider tastes kind of funky, let it sit for another week or two – on the same note, if it tastes REALLY funky, it is probably contaminated and you should toss it.
Drink it ice cold or at room temperature. Ice cold it is refreshing and palate cleansing and goes really well with pizza. At room temperature the fruit flavors are more easy to identify and enjoy and savor by themselves.
Temperature will change things, too. The yeast will multiply and mature your cider faster in warmer temperatures but, unfortunately, will also mutate to a less desirable form and can make your cider less refined tasting. The safe path for cider storage is placing it in a very cool place. Rapid maturation can also result in exploding bottles. If your cider is fermenting too fast in the bottle, the slowed down process in the refrigerator can keep the pressure as a slow leak through the bottle cap instead of an explosion.